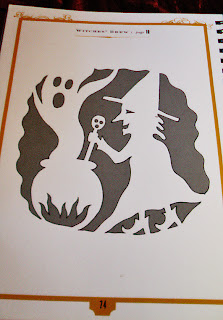
In the previous entry, I talked about the book 'Great Pumpkins: Crafty Carving for Halloween', by Peter Cole (with Jessica Hurley). Well, this time, I'm going to show you some pumpkins that Madame Luciel and I carved, including one from that book! 'Witches' Brew' was one of the stencils included and is a spooky and fun design. We didn't use the stencil because Luciel carved it freehand and, even though in the instructions it says you need a lot of tools, we managed only using the pumpkin, knife, bowl, spoon, tea light and newspaper.
 |
| 'Witches' Brew' stencil |
 |
| 'Witches' Brew' from 'Great Pumpkins' |
Some of our Jack-o'-lanterns are below:
For instructions on how to make 'Witches' Brew', click the jump below: |
| Our version of 'Witches' Brew' |
 |
| Our version of 'Witches' Brew', lit up |
 |
| Some more of our jack-o'-lanterns (original designs) |
Boil, bubble, toil and trouble...We've brewed up a wicked stencil (page 74).Witch designs are so fun to make because everyone recognises their spooky outlines.
You will need:
- Newspaper
- Largish pumpkin, at least 12 inches in diameter
- Thin-bladed paring knife
- Strong metal kitchen spoon
- Bowl
- Stencil (page 74)
- Scissors
- Clear tape
- Pricking tool
- Drill bit
- Pumpkin saw
- Platter
- Tea light
Cover your work surface with newspaper. Choose which side of your pumpkin will be the front, and then use the paring knife to cut an access hole. Scrape out your pumpkin with the spoon, placing the seeds and pulp in the bowl. Enlarge the stencil to about one-half to two-thirds the height of your pumpkin. Trim the excess paper around the witch design, cut the 4 slits where indicated, and tape the design on your clean pumpkin.
Using the pricking tool, poke small holes about 1/4 inch apart along all the lines of the design. Remove the stencil and keep it for reference when carving. With the drill bit, make a small hole in the center of each shape to be cut out, twisting it in a clockwise direction. Drill the holes in the skull-handled spoon as well.
Then, holding the pumpkin saw at a right angle to the surface, insert the blade in a hole and cut around the skull-handled spoon first. Continue carving around the witch's arm and face. Next, cut the fire under the cauldron, and swirling ghost. Saw the remaining lines, taking care around the broad hat brim. Remove any pieces from inside the pumpkin before placing it on a platter and inserting the tea light. Cut a chimney hole if needed.
From 'Great Pumpkins', By Peter Cole with Jessica Hurley

0 comments:
Post a Comment